|
Chris Cuff, a friend, fellow collector and
frequent contributor to this website, is quite a creative individual.
He has kindly agreed to share with you some of his antique Christmas
light related projects. We hope you enjoy them!

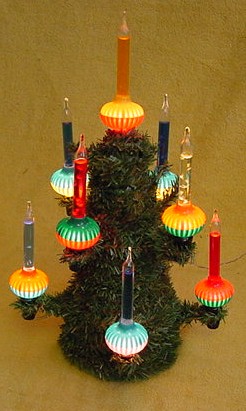
The $5.00
Bubble Light Tree
Everyone
loves the vintage visca-type bubble light trees. The problems with the
wonderful old trees are both the cost (typically anywhere from $100.00
to $300.00) and the shedding. Sadly, nothing can be done about either,
so Chris has come up with an ingenious project that will allow almost
anyone to make one of these popular trees. Chris writes:
Here we are
going to build our own bubble light tree, using the very simple step by
step instructions below. Now obviously, $5.00 is NOT going to buy a set
of bubble lights... but it will make the tree. Everyone has a
few old strings of lights around to use for this project, perhaps an
older vinyl cord with no box.. But even if you don't I will show how to
make a string of lights from scratch, using sockets available at Radio
Shack so let's get started! (Do not use C7 type lamps- they are a bit
too big and heavy for this project- as well as too hot.)
| Here we have our needed
supplies:
2- 12" Canadian fir trees from AC
Moore- $1.00 each. (I chose these as they have very short fir, and look
VERY real!)
1- empty margarine tub (for the base)
1- Styrofoam cone- $1.59 at Wal-Mart
1- 9 lamp C6 light set and bubble
lamps (Now, most C-6 light sets are 8 sockets. Here, we will simply
splice in an extra socket, clipped from an old second set of lights, or
add on one of the Radio Shack sockets shown below. Use this added-on
socket for the top light.) You will still need to get your own bubble
lamps- Sources listed later.
1- spool of florists wire $1.00 at AC
Moore or Wal-Mart.
Standard hand tools- Pliers, wire
cutters, etc.
|

|
| Begin by preparing your greens for
garlands and socket arms.
You simply take the base off the mini tree, and
untwist the trunk with a pair of pliers. The trunk is just 2 pieces of
stiff wire twisted together holding the branches in.
You will be using florist's wire to put the branches
together as shown. Overlap each branch about 3/4" then tie together
tightly by wrapping the florist's wire around the 2 branches.
Take the Styrofoam cone and "roll" the wide end on
the counter, just enough to flatten the edge so it will slip inside the
empty margarine tub (The tub will be your base when you are all done)
|
|
|
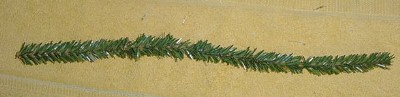
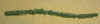
As you can see, the florist's wire
makes garlands easy! You can't see the joints where you put them
together, and can make them as long as you need. For the socket arms, 2
is plenty. For the main garland, make a couple of garlands about 6 feet
long each.
|
|
| If you plan to make your own string of
sockets, solder 9 Radio Shack Part #
272-356 sockets together as shown here on the right.
Use about 9 inches of wire between the sockets- extra wire will be
hidden when the tree is wrapped later. After making your connections,
and testing your string, fill the exposed wiring area with "RTV" type
silicone sealer for safety.
This picture also shows how to add on your ninth
socket, if using a normal 8 socket string. Just cut the existing string
at it's mid-point, and add in the top socket.
|

|
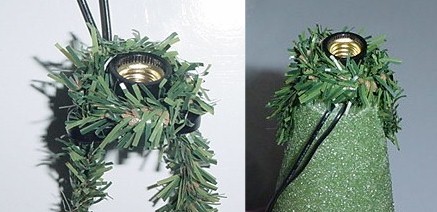
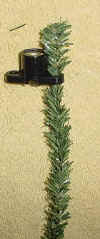
| On the right, I have shown the top
socket. The left hand side shows the Radio Shack style socket ready to
put on the tree- on the right side, it is mounted to the cone. bend the
bottom ends of the branches in at a right angle, and plug them into the
tree. The garland wrap will also serve to keep the socket more firmly
in place. The construction of the other 8 socket assemblies is shown
below. |
|
| OK, now we will prepare our light set.
If using a pre-made set, simply wrap a long branch around one socket,
and twist tightly like so. |

|
|
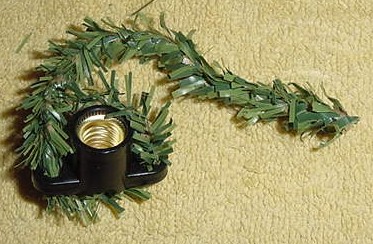
If you are making your own light set,
first wire 9 Radio Shack C6 sockets in series with a 9 or 10"
piece of insulated wire between each socket in a loop, soldering to the
terminals on the bottom of the socket. The wire is NOT shown here, but
must be done first.
To make the arms, push one long branch
through a hole in the socket, and pull the branch down so it looks like
so. Feed the branch back up the other hole and pull it tight, and wrap
it around the socket as shown in the pictures below.
|
|
|

|

|
|
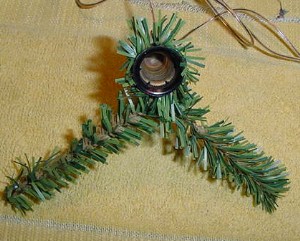
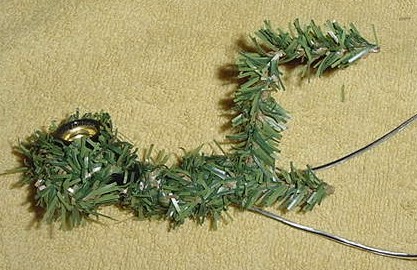
Now, make your other branches,
wrapping around the socket, and ending up with an "assembly" as shown
on the right. Note the right angle bends- These are going to "plug in"
to the Styrofoam cone body of your tree, while giving a short vertical
area of garland which will be held captive when you wrap the finished
tree later on. You need to make 8 of these- 4 for the bottom tier, and
4 for the middle tier.
|

|
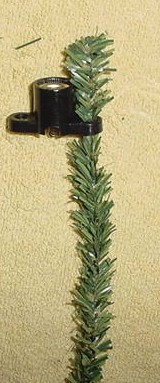
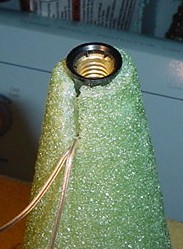
| If you are using a pre-made string of
lights, refer to the picture on the right to mount the top socket. Note
the cut out to allow the wire to come out the side at the bottom of the
socket. Just push the socket down into the Styrofoam. The Styrofoam
will "crunch down" to accommodate the socket. |

|
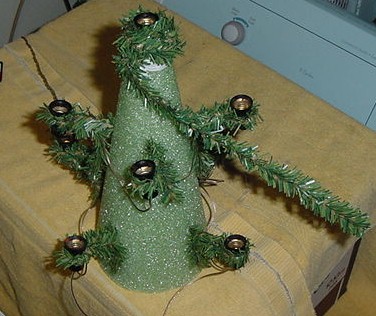
| Now, "Plug in" your socket/arm
assemblies into the tree as shown. Refer to the "bird's eye view" on
the right - You want the tree to look like this when looking down on it
from the top for nice symmetry. |

|
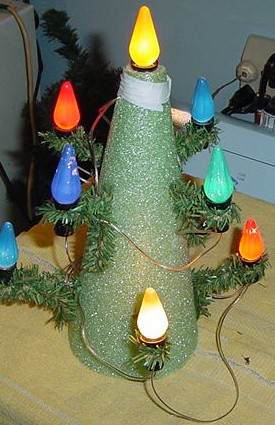
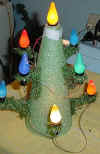
| This is a view of your tree with all the
sockets in place. Now is a good time to test the tree before you wrap
it with garland. Use standard C6 bulbs for now, in case of
"accidents"... |
|
| OK, Let's Wrap! Begin at the top, using
a 6 foot (or so) length of garland that you have made up wiring several
branches together as shown before. Stick one end in to the top area of
the tree, and wrap the tree in a spiral fashion downwards. when you get
to the end of one garland, wrap it around the nearest arm, and build
another garland and keep going, starting where you left off. |

|
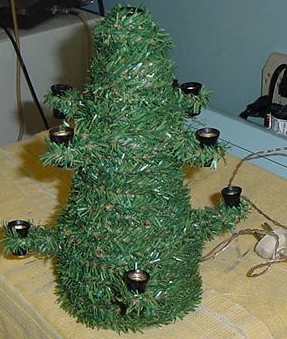
| Now, we have our wrapped tree! Easy,
wasn't it! Notice how the garland is holding the arms captive, yet
allowing flexibility to re-position the arms as needed. You can also
bend the arms down, so the sockets point outwards and use your tree for
the ever popular Matchless star lamps! |

|
| All that's left to do at this point is
place as many small branches you want all over the tree, sticking them
right into the tree to fill it out.
|

|
| Lastly, fill the margarine tub with some
stones and using craft glue, cement it on to the bottom of the tree-
Push it up about a 1/2 inch, and your project is complete! |
|
A note about sources for materials: If you
have no C6 bubble lights, Here is where you can get the parts to make
your own lamps. Quite easy, and the sites listed give their own very
good instructions on how to make them.
Lion's Den Antiques: Paul Schofield is a
good friend and supplier for bubble tube vials, as well as new
replacement lamps. Please visit his website HERE
Magical Holiday is another wonderful
supplier of reproduction Noma C6 bubble light bases. I have used them,
and highly recommend them Click HERE
to go to their website.
I do hope you enjoy the
Project Page! Please email me HERE
with any questions, or for assistance in obtaining materials- I have
most everything, including the AC Moore mini trees available year-round!
Chris Cuff

BACK
NEXT
PROJECT
|